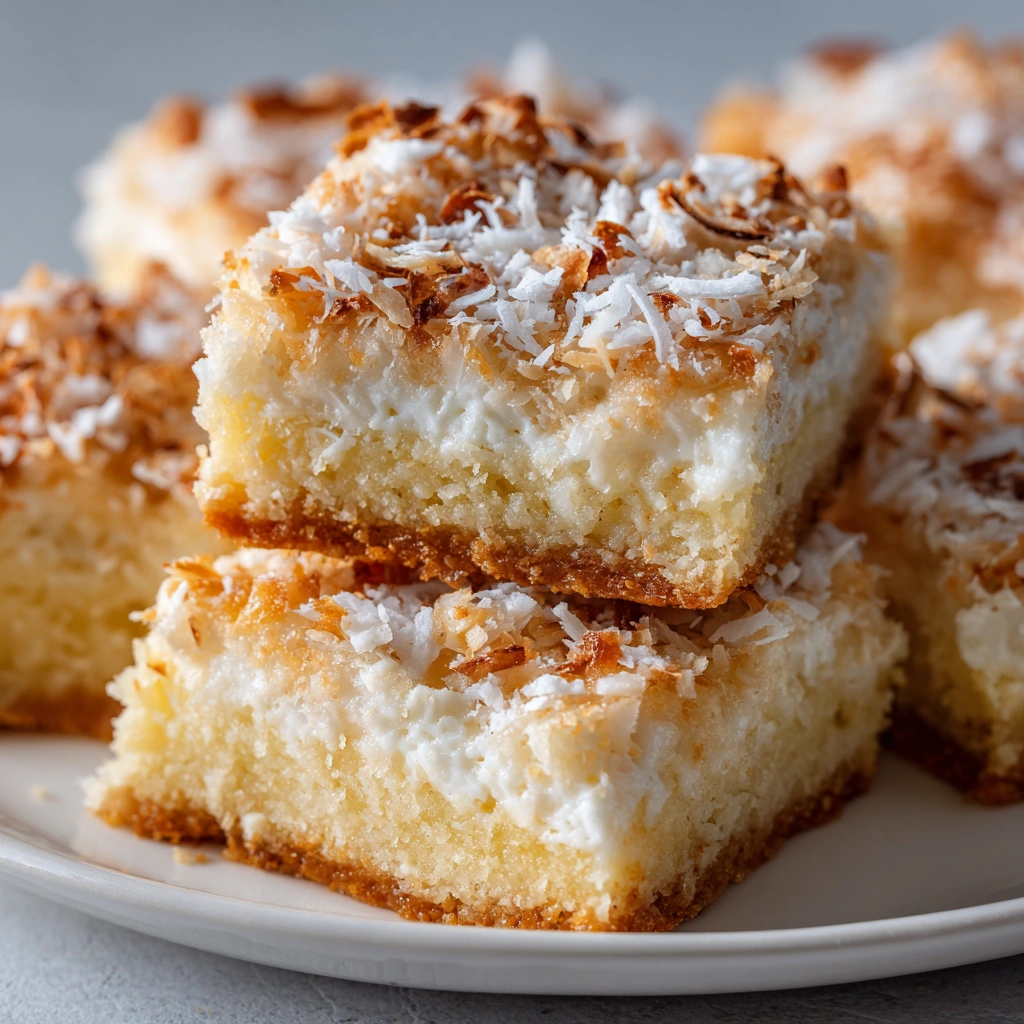
Introduction to Coconut Cream Dream Bars
Hey there, fellow dessert lovers! If you’re anything like me, you know that life can get pretty hectic. Between juggling work, family, and everything in between, finding time to whip up a delightful treat can feel impossible. That’s where these Coconut Cream Dream Bars come in! They’re not just a quick solution for a busy day; they’re a creamy, dreamy escape that will impress your loved ones. With a buttery crust and a luscious coconut filling, these bars are sure to become your new favorite dessert. Trust me, you won’t want to miss out on this deliciousness!
Why You’ll Love This Coconut Cream Dream Bars
These Coconut Cream Dream Bars are a breeze to make, perfect for busy moms and professionals alike. With just a handful of ingredients, you can whip up a delightful dessert in no time. The combination of creamy coconut and a buttery crust creates a taste sensation that’s hard to resist. Plus, they’re versatile enough for any occasion, whether it’s a family gathering or a cozy night in. You’ll love how quickly they disappear!
Ingredients for Coconut Cream Dream Bars
Let’s gather our ingredients for these delightful Coconut Cream Dream Bars! Each component plays a vital role in creating that perfect balance of flavors and textures. Here’s what you’ll need:
- All-purpose flour: This is the base for our buttery crust, providing structure and a tender bite.
- Unsweetened shredded coconut: Adds a delightful chewiness and rich coconut flavor. You can also use sweetened if you prefer a sweeter treat.
- Powdered sugar: This sweetener gives the crust a melt-in-your-mouth quality, making it irresistibly delicious.
- Unsalted butter: Softened butter is key for a rich, buttery flavor in the crust. If you’re dairy-free, coconut oil can be a great substitute!
- Sweetened condensed milk: This creamy ingredient adds sweetness and a luscious texture to the filling. It’s the heart of our dessert!
- Coconut cream: For that extra coconut richness, coconut cream is a must. It makes the filling ultra-creamy and dreamy.
- Fresh lime juice: A splash of lime juice brightens the flavors and balances the sweetness beautifully.
- Salt: Just a pinch enhances all the flavors, making them pop!
- Vanilla extract: This classic flavor adds warmth and depth to the filling. You can also try coconut extract for an extra coconut kick!
For exact measurements, check the bottom of the article where you can find everything listed for easy printing. Now, let’s get ready to create some magic in the kitchen!
How to Make Coconut Cream Dream Bars
Now that we have our ingredients ready, let’s dive into the fun part—making these Coconut Cream Dream Bars! Follow these simple steps, and you’ll be on your way to a delicious treat that will have everyone asking for seconds.
Step 1: Preheat the Oven
First things first, preheat your oven to 350°F (175°C). Preheating is crucial because it ensures even baking. If you skip this step, your bars might not set properly, and nobody wants a gooey mess! So, let that oven warm up while you prepare the crust.
Step 2: Prepare the Crust
In a mixing bowl, combine the all-purpose flour, unsweetened shredded coconut, powdered sugar, and softened butter. Use a fork or your fingers to mix until the texture resembles coarse crumbs. You want it crumbly but still able to hold together when pressed. This crust is the foundation of our Coconut Cream Dream Bars, so make sure it’s just right!
Step 3: Bake the Crust
Once your crust mixture is ready, press it firmly into the bottom of a greased 9×9 inch baking dish. Bake it in the preheated oven for about 15 minutes or until it’s lightly golden. Keep an eye on it! You want that perfect golden hue, which means it’s ready for the next step.
Step 4: Make the Coconut Filling
While the crust is baking, let’s whip up the coconut filling. In another bowl, whisk together the sweetened condensed milk, coconut cream, fresh lime juice, salt, and vanilla extract. Mix until smooth and creamy. This filling is where the magic happens, so make sure it’s well combined and free of lumps!
Step 5: Combine and Bake Again
Once your crust is done, pour the luscious coconut filling over it. Spread it evenly with a spatula. Now, pop it back into the oven and bake for an additional 20-25 minutes. You’ll know it’s done when the filling is set and slightly firm to the touch. The aroma will be heavenly, trust me!
Step 6: Cool and Cut
After baking, let your Coconut Cream Dream Bars cool completely in the dish. This step is essential! If you cut them too soon, they might fall apart. Once cooled, slice them into bars and serve. You can enjoy them chilled or at room temperature, whichever you prefer!
Tips for Success
- Use room temperature ingredients for a smoother filling.
- Don’t skip the cooling step; it helps the bars set properly.
- For a fun twist, try adding chocolate chips to the filling!
- Keep an eye on the crust; it can go from golden to burnt quickly.
- Garnish with extra shredded coconut or lime zest for a beautiful presentation.
Equipment Needed
- 9×9 inch baking dish (a similar-sized dish works too)
- Mixing bowls (any size will do, just make sure they’re sturdy)
- Whisk (a fork can work in a pinch)
- Spatula (a spoon can also help spread the filling)
- Measuring cups (or use a kitchen scale for precision)
Variations of Coconut Cream Dream Bars
- Chocolate Coconut Dream Bars: Add a layer of chocolate ganache on top for a rich twist. Just melt some chocolate and pour it over the cooled bars!
- Gluten-Free Option: Substitute all-purpose flour with a gluten-free flour blend. This way, everyone can enjoy these delicious bars!
- Vegan Version: Use coconut oil instead of butter and a plant-based condensed milk alternative. You can also replace eggs with flaxseed meal if needed.
- Fruit-Infused Bars: Mix in some diced pineapple or mango into the coconut filling for a tropical burst of flavor.
- Nutty Coconut Bars: Add chopped nuts like almonds or macadamia nuts to the crust for an extra crunch and flavor.
Serving Suggestions for Coconut Cream Dream Bars
- Pair with a scoop of vanilla ice cream for a delightful contrast in temperature and texture.
- Serve alongside fresh fruit like berries or sliced mango for a refreshing touch.
- Drizzle with chocolate sauce or caramel for an indulgent twist.
- Garnish with lime zest and extra shredded coconut for a beautiful presentation.
- Enjoy with a cup of herbal tea or a tropical smoothie for a perfect afternoon treat.
FAQs about Coconut Cream Dream Bars
As you embark on your journey to create these Coconut Cream Dream Bars, you might have a few questions. Don’t worry; I’ve got you covered! Here are some common queries that pop up when making this delightful dessert.
Can I make Coconut Cream Dream Bars ahead of time?
Absolutely! These bars can be made a day in advance. Just store them in the refrigerator, and they’ll be even more delicious the next day!
What’s the best way to store leftovers?
Keep your Coconut Cream Dream Bars in an airtight container in the fridge. They’ll stay fresh for up to a week, making them a perfect treat for busy days.
Can I freeze Coconut Cream Dream Bars?
Yes, you can freeze them! Just wrap the bars tightly in plastic wrap and then in aluminum foil. They’ll last for about three months in the freezer. Thaw them in the fridge before serving.
What can I substitute for sweetened condensed milk?
If you need a substitute, you can use homemade condensed milk made from coconut milk and sugar. It’s a great alternative for a dairy-free option!
How can I make these bars more coconutty?
For an extra coconut flavor, try adding coconut extract along with the vanilla. You can also sprinkle more shredded coconut on top before baking!
Final Thoughts
Making Coconut Cream Dream Bars is more than just baking; it’s about creating sweet memories in the kitchen. The joy of mixing, pouring, and watching these bars transform is a delightful experience. Each bite is a creamy, coconut-infused hug that brings smiles to faces, whether it’s a family gathering or a quiet evening at home. I love how these bars can brighten up any day, making them a go-to treat for busy moms and professionals alike. So, roll up your sleeves, embrace the process, and enjoy the delicious rewards of your efforts!
Print
Coconut Cream Dream Bars: Discover Your New Favorite Treat!
- Prep Time: 15 minutes
- Cook Time: 40 minutes
- Total Time: 55 minutes
- Yield: 16 bars 1x
- Category: Dessert
- Method: Baking
- Cuisine: American
- Diet: Vegetarian
Description
Coconut Cream Dream Bars are a delicious and creamy dessert that combines the rich flavor of coconut with a buttery crust, making them a perfect treat for any occasion.
Ingredients
- 1 cup all-purpose flour
- 1/2 cup unsweetened shredded coconut
- 1/2 cup powdered sugar
- 1/2 cup unsalted butter, softened
- 1 can (14 oz) sweetened condensed milk
- 1/2 cup coconut cream
- 1/4 cup fresh lime juice
- 1/4 teaspoon salt
- 1/2 teaspoon vanilla extract
Instructions
- Preheat the oven to 350°F (175°C).
- In a mixing bowl, combine flour, shredded coconut, powdered sugar, and softened butter. Mix until crumbly.
- Press the mixture into the bottom of a greased 9×9 inch baking dish to form the crust.
- Bake the crust for 15 minutes or until lightly golden.
- In another bowl, whisk together sweetened condensed milk, coconut cream, lime juice, salt, and vanilla extract until smooth.
- Pour the coconut mixture over the baked crust.
- Bake for an additional 20-25 minutes until the filling is set.
- Allow to cool completely before cutting into bars.
- Serve chilled or at room temperature.
Notes
- For a stronger coconut flavor, use coconut extract in addition to vanilla.
- These bars can be stored in the refrigerator for up to a week.
- Garnish with additional shredded coconut or lime zest for presentation.
Nutrition
- Serving Size: 1 bar
- Calories: 180
- Sugar: 12g
- Sodium: 50mg
- Fat: 8g
- Saturated Fat: 5g
- Unsaturated Fat: 2g
- Trans Fat: 0g
- Carbohydrates: 24g
- Fiber: 1g
- Protein: 2g
- Cholesterol: 15mg