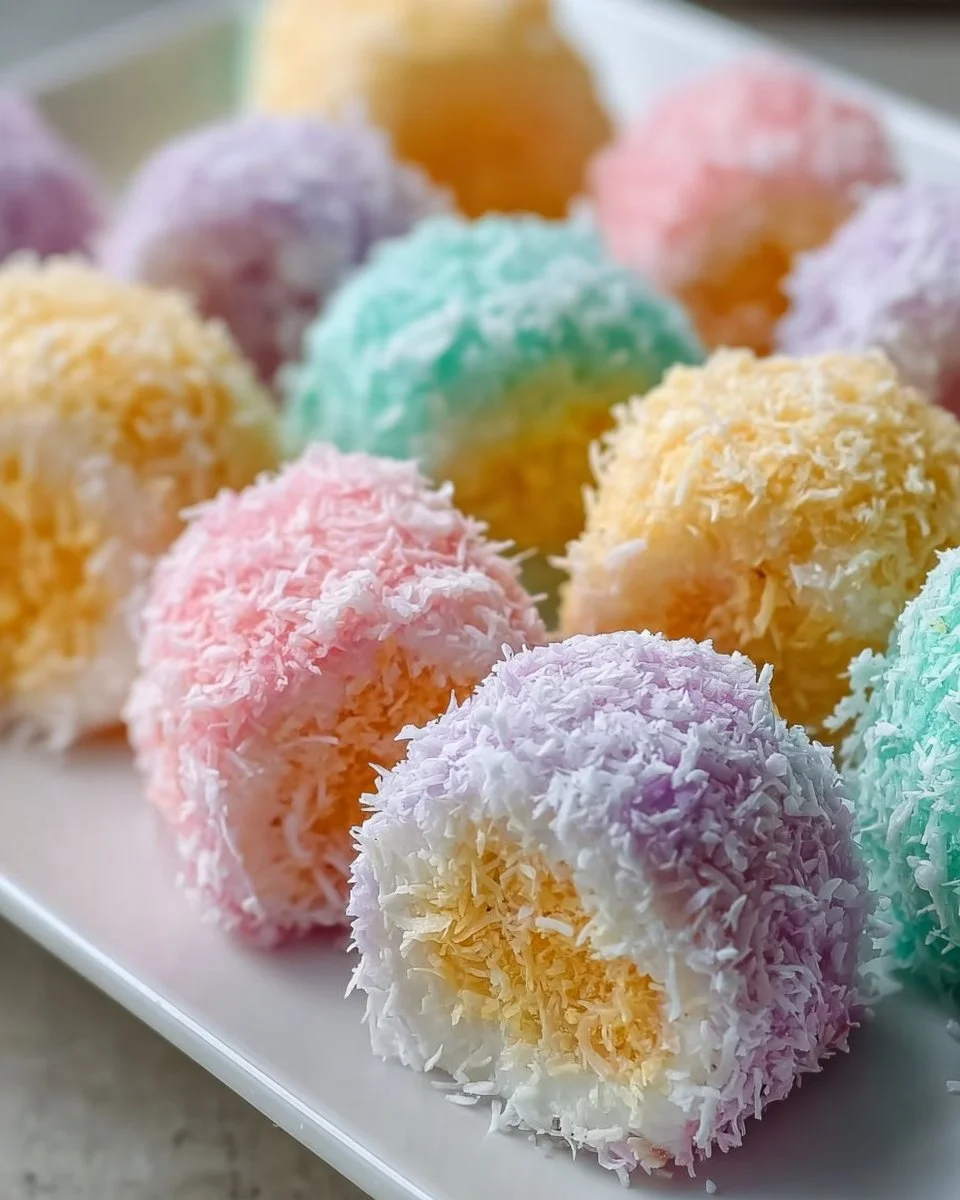
The air fills with a sweet, inviting aroma, as you prepare to create a delightful treat that brings the spirit of Easter into your kitchen: Easter Bunny Coconut Tails. These vibrant, colorful confections not only make your table pop with joy but also deliver a delightful crunch complemented by a luscious, creamy filling that encapsulates the essence of spring. As you break into these whimsical goodies, the outer layer of sweetened coconut gives way to a deliciously chewy center, making every bite a joyful experience. You can’t help but smile as the pastel colors beckon, stimulating the senses and transporting you to a sunlit meadow where bunnies frolic and flowers bloom.
With every handcrafted coconut tail, you embrace the joy of the season, eliciting memories of family gatherings and decorated egg hunts. Their unique charm captures the spirit of Easter, inviting adults and children alike to delight in the nostalgia of holiday traditions. Whether you arrange them on a dessert table, gift them in festive boxes, or enjoy them with loved ones as you bask in the warmth of shared laughter, these vibrant treats are the perfect edible expression of spring’s renewal and cheer.
Why You’ll Love These Easter Bunny Coconut Tails
A burst of creativity meets a rush of nostalgia with these delightful Easter Bunny Coconut Tails. They’re not just treats; they’re edible experiences that awaken childhood memories and infuse any gathering with festive spirit. Each tantalizing bite creates a beautiful harmony of flavors, with the sweetness of condensed milk and the exhilarating texture of shredded coconut. The pastel shades invite a sense of playfulness, making these coconut tails perfect for all occasions, from egg hunts to spring soirées.
You can whisk these festive delights together in no time, making them an excellent choice for last-minute treats. The appeal lies not only in their taste but also in their charming aesthetic, which can turn any gathering into a celebration. Plus, their gluten-free and nut-free nature means you can share them confidently with friends and family, ensuring that everyone feels included in the festivities.
Preparation Phase & Tools to Use
Creating these delightful coconut tails requires just a few simple tools, all of which play a crucial role in assembling your treats with ease and flair:
- Mixing Bowl: A large mixing bowl caters to the generous size of the coconut mixture, allowing for comfortable stirring and combine of all ingredients.
- Spatula: A flexible spatula helps mix the ingredients seamlessly, ensuring every shard of coconut gets well-coated with the creamy mixture.
- Measuring Cups: Precise measurements guarantee consistent texture and flavor in every batch.
- Parchment Paper: This non-stick surface provides a perfect landing for your coconut tails as they firm up in the refrigerator.
- Food Coloring: Gel food colors create vibrant, pastel hues that make your treats pop visually and make them irresistibly festive.
Preparation Tips
- Have all your ingredients ready for a smooth workflow.
- If you prefer, wear disposable gloves while mixing and rolling for cleaner hands and a more vibrant finish.
Ingredients for Easter Bunny Coconut Tails
To create these delightful Easter Bunny Coconut Tails, gather the following ingredients:
- 1 can (14 oz) sweetened condensed milk
- 1 teaspoon vanilla extract
- 4 cups shredded sweetened coconut (plus extra for rolling)
- Gel food coloring (pastel pink, yellow, blue, green, and purple)
Key Ingredient Insights
- Sweetened Condensed Milk: This rich ingredient creates an indulgent sweetness that binds the coconut together. You can substitute it with coconut cream for a dairy-free option, but the texture may differ.
- Shredded Sweetened Coconut: Use quality unsweetened shredded coconut if you prefer less sweetness, enhancing the flavors with a sprinkle of sugar.
- Gel Food Coloring: Gel colors deliver brighter hues with a small amount, making them ideal for achieving those lovely pastels. Liquid food coloring will work too, but you may require more to reach the desired shade.
How to Make Easter Bunny Coconut Tails
Crafting these delightful coconut tails is as satisfying as it is simple. Follow these step-by-step instructions to bring your creations to life:
- In a large mixing bowl, combine the sweetened condensed milk and vanilla extract. Stir the two together until well blended, forming a creamy base.
- Gradually add in the shredded coconut, using your spatula to fold the mixture gently. Make sure every strand of coconut gets coated and moist.
- Divide the coconut mixture into 4-5 equal parts, depending on how many colors you wish to create.
- Add a few drops of gel food coloring to each portion, mixing thoroughly until you achieve beautiful pastel shades. Feel free to blend colors for a unique palette!
- Once colored, take small portions of the coconut mixture and roll them into 1-inch balls using your hands. Each ball will start to resemble adorable tails.
- Roll each ball in the extra shredded coconut, ensuring they are fully coated. This extra layer provides a delightful crunch and enhances the coconut flavor.
- Transfer the coconut tails to a parchment-lined tray, arranging them neatly. Place the tray in the refrigerator for at least 1 hour to set, allowing the flavors to meld perfectly.
- Finally, arrange the vibrant coconut tails on a platter, and watch as they brighten up your Easter celebrations!
Chef’s Notes & Helpful Tips
- Make-Ahead Tips: You can prepare these coconut tails a day in advance. Just store them in an airtight container in the refrigerator.
- Cooking Alternatives: If you prefer a warm treat, consider toasting the shredded coconut lightly before mixing; this adds a deeper flavor.
- Customization Ideas: Add sprinkles, edible glitter, or even festive designs using melted chocolate for an extra decorative touch. You can even fill them with small chocolate candies for delightful surprises inside!
Common Mistakes to Avoid
- Overmixing: Avoid overmixing the coconut with the liquid base as this can lead to a dense texture. Stir gently until just combined for optimal lightness.
- Skipping the Refrigeration: Allowing the tails to set in the refrigerator is essential; skipping this step can result in a crumbly mess instead of delightful bites.
- Inaccurate Measurements: Measuring the ingredients carefully is crucial for achieving the ideal texture and flavor balance.
What to Serve With Easter Bunny Coconut Tails
Pair these festive coconut treats with complementary delights to enhance your Easter festivities:
- Fresh Fruits: Bright, juicy strawberries and zesty pineapple offer a refreshing contrast.
- Chocolate Bunnies: What’s Easter without chocolate? The creamy sweetness pairs beautifully with the coconut tails.
- Vanilla Ice Cream: Serve them alongside a scoop of vanilla ice cream for an indulgent treat.
- Cupcakes: Add colorful cupcakes topped with buttercream to your dessert table for a cheerful spread.
- Coffee or Tea: Enhance the experience with a hot cup of coffee or fragrant tea, balancing the sweetness of the coconut tails.
- Cheese Platter: A savory cheese platter can create an intriguing contrast to the sugary treats and add depth to your menu.
- Easter Egg Hunt Favors: Use the coconut tails as delightful prizes for games; everyone loves a sweet reward!
Storage & Reheating Instructions
Store your coconut tails in an airtight container in the refrigerator for up to a week. For longer storage, freeze them for up to three months. To enjoy, simply remove the desired portion from the freezer and let them thaw at room temperature for about 30 minutes. There’s no need to reheat—enjoy them cold for the perfect satisfying treat.
Estimated Nutrition Information
This recipe provides approximately 120 calories per piece (including some variance based on individual ingredients and serving sizes). For more accurate dietary needs, consider calculating based on your specific ingredient choices and portion sizes. Please note, these values can vary.
FAQs
Can I make these coconut tails gluten-free?
Absolutely! The ingredients used are naturally gluten-free, making this treat safe for those with gluten sensitivities.
How can I achieve better pastel colors?
Using gel food coloring will yield the most vibrant shades with minimal product. For softer colors, add a drop at a time until you achieve your desired hue.
What if I don’t have shredded coconut?
Finely chopped nuts or oats could be a substitute, though each offers a distinct flavor and texture. Experimenting can lead to new and interesting results!
Can I use almond extract instead of vanilla?
Yes, almond extract can add a delightful twist, giving a slightly nutty flavor that pairs well with coconut.
How do I fix a crumbly mixture?
If your mixture feels too crumbly, add a bit more sweetened condensed milk gradually until it holds together better. Avoid adding too much to maintain the intended flavor balance.
Conclusion
Easter Bunny Coconut Tails beckon from your kitchen, filling it with the enchanting aroma of sweetness and celebration. These charming, pastel-hued confections bring joy not only to the taste buds but also to the heart, making them the perfect addition to your spring festivities. So roll up your sleeves, gather your loved ones, and let the magic of these delightful treats fill your Easter with warmth, laughter, and sweetest memories. Try this recipe, and bask in the joy of creating delicious traditions that will linger long after the holiday ends. Happy baking!
Print
Easter Bunny Coconut Tails
- Prep Time: 15 minutes
- Cook Time: 0 minutes
- Total Time: 75 minutes
- Yield: 12 servings 1x
- Category: Dessert
- Method: No-Bake
- Cuisine: American
- Diet: Gluten-Free
Description
Delightful pastel-colored coconut confections perfect for Easter celebrations.
Ingredients
- 1 can (14 oz) sweetened condensed milk
- 1 teaspoon vanilla extract
- 4 cups shredded sweetened coconut (plus extra for rolling)
- Gel food coloring (pastel pink, yellow, blue, green, and purple)
Instructions
- Combine sweetened condensed milk and vanilla extract in a large mixing bowl.
- Add shredded coconut gradually, folding gently with a spatula.
- Divide mixture into 4-5 parts based on desired colors.
- Mix gel food coloring into each portion until vibrant shades are achieved.
- Roll small portions into 1-inch balls resembling tails.
- Coat each ball in extra shredded coconut.
- Transfer to a parchment-lined tray and refrigerate for at least 1 hour.
- Arrange the coconut tails on a platter to serve.
Notes
These treats can be made a day in advance. Store in an airtight container in the refrigerator. Customize with sprinkles or chocolate for added fun!
Nutrition
- Serving Size: 1 piece
- Calories: 120
- Sugar: 16g
- Sodium: 75mg
- Fat: 4g
- Saturated Fat: 3g
- Unsaturated Fat: 1g
- Trans Fat: 0g
- Carbohydrates: 19g
- Fiber: 1g
- Protein: 2g
- Cholesterol: 5mg