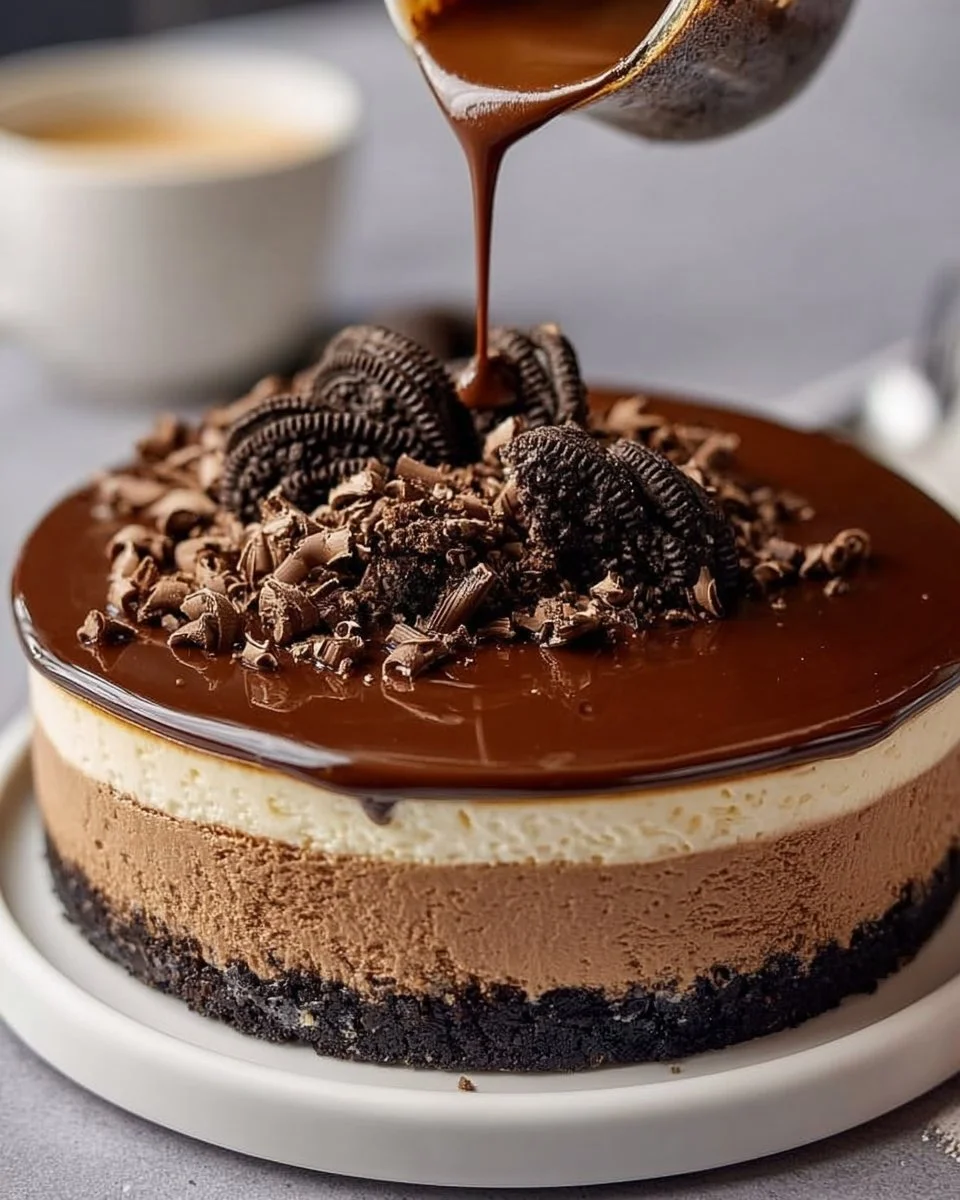
The rich aroma of roasted coffee fills the air, mingling seamlessly with the sweet scent of chocolate, creating an intoxicating symphony that beckons from the kitchen. As you step closer, the glossy top glistens under the soft light, teasing your senses with promise. This espresso cheesecake isn’t just a dessert; it’s an experience – lush creaminess meets a decadent chocolate crunch that invites indulgence with every bite. The initial crunch gives way to a velvety filling that feels like a warm embrace, and as you savor it, the deep espresso notes awaken your taste buds, enticing you into a realm of pure bliss.
Imagine hosting friends or family, and as they take their first forkful, their eyes widen in delight. The marriage of rich cream cheese and smooth espresso, beautifully balanced by the slight bitterness of chocolate, transforms you into a master of celebration. Whether it’s a casual get-together or a lavish holiday feast, this cheesecake draws everyone into delightful conversation, each person vying for their second slice, reluctant to let any crumb go to waste.
Why You’ll Love This Espresso Cheesecake
This espresso cheesecake stands tall amongst desserts for more reasons than one. First, it pleases both coffee lovers and dessert enthusiasts alike. Each slice unfolds layers of flavors—cream cheese whispers sweetness, while the bold espresso notes awaken the senses. The smooth chocolate crust contrasts wonderfully with the creamy filling, creating a symphony of textures that’s both satisfying and indulgent.
Perfect for a wide array of occasions, this cheesecake elevates any gathering. Birthdays, anniversaries, or a simple weekday dinner turn into something special when this showstopper graces the table. It invites laughter and connection, making memories etched in deliciousness. Its distinctiveness lies not just in its flavor but in its captivating appearance, complete with a luscious ganache topping and delicate chocolate shavings, beckoning each guest to dive in.
Preparation Phase & Tools to Use
Before diving into the magic of baking, equip yourself with a few essentials that make the process seamless.
- 9-inch Springform Pan: The key to a perfect cheesecake is in its shape. A springform pan allows for easy removal without damaging the delicate crust and filling, enabling a pristine presentation.
- Mixing Bowls: A set of mixing bowls is fundamental for combining ingredients—don’t skimp on sizes; having a few will help you keep things organized and manageable.
- Electric Mixer: Achieve that perfect creamy consistency with ease. An electric mixer speeds up the process, ensuring your cream cheese is silky smooth.
- Measuring Cups and Spoons: Accuracy in baking is everything! Use clear measuring tools to guarantee that each ingredient is precisely accounted for.
- Rubber Spatula: This tool is your best friend for scraping down the sides of bowls and ensuring nothing goes to waste.
As you prepare, remember to bring your cream cheese to room temperature before mixing. This small detail makes blending incredibly smooth, preventing lumps that can disrupt the heavenly texture that you’re aiming for.
Ingredients for Espresso Cheesecake
- 2 cups chocolate cookie crumbs (like Oreos, no filling): These form the sturdy base, infusing the cheesecake with a rich, sweet chocolate flavor. If you desire a little twist, graham cracker crumbs can also serve as a delightful alternative.
- 5 tbsp melted butter: This binds your cookie crumbs together and contributes to that satisfying crunch.
- 3 (8 oz) packages cream cheese, softened: The creamy heart of your cheesecake, it creates that rich, luscious filling. Opt for full-fat cream cheese for the best flavor and texture.
- 1 cup granulated sugar: Sweetness enhances the other flavors and balances the bittersweet espresso.
- 1/2 cup sour cream: This adds a tangy note and keeps your cheesecake moist and rich.
- 1/4 cup heavy cream: A touch of heavy cream makes the filling extra decadent, contributing to a luscious mouthfeel.
- 2 tbsp instant espresso powder: The star ingredient that brings bold coffee flavor right to your dessert. Don’t hesitate to use a high-quality brand for the best results.
- 1 tsp vanilla extract: A splash of vanilla rounds out the flavors, adding warmth and depth.
- 3 large eggs: These help to set your cheesecake, giving it that perfect, pillowy texture.
- 1/2 cup heavy cream (for ganache): This creamy layer elevates the dessert to another level, creating a glossy finish.
- 4 oz semi-sweet chocolate, finely chopped: Use high-quality chocolate to ensure a rich and luxurious ganache.
- Dark chocolate shavings or curls (for garnish): These delicate touches create visual appeal and provide an extra crunch.
How to Make Espresso Cheesecake
Creating this masterpiece requires a touch of patience, but the reward is undeniably worth it! Follow these steps for a foolproof dessert.
-
Preheat your oven: Set it to 325°F (160°C) to ensure even baking.
-
Prepare the crust: In a mixing bowl, combine the chocolate cookie crumbs with melted butter, mixing until fully incorporated. Firmly press this mixture into the bottom of your 9-inch springform pan to create a solid base. Bake for 10 minutes, then allow it to cool completely before adding the filling.
-
Craft the filling: In a large mixing bowl, beat the softened cream cheese until smooth and creamy. Gradually add sugar, mixing until well combined. Pour in the sour cream, heavy cream, and dissolve the instant espresso powder in a tablespoon of warm water before adding that too, along with the vanilla extract. Mix until the filling is beautifully smooth.
-
Add the eggs: Incorporate the eggs one at a time, mixing well after each addition. This step is crucial for a light, airy texture that will set beautifully.
-
Pour and bake: Pour the filling over the cooled crust, spreading it evenly. Bake in your preheated oven for 50-60 minutes or until the edges are set but the center still has a slight jiggle. Turn off the oven and leave the cheesecake inside with the door cracked open for about an hour. This gentle cooling prevents cracks and ensures a creamy consistency.
-
Make the ganache: In a small saucepan over low heat, warm the heavy cream until it starts to steam. Remove from heat and pour over the finely chopped chocolate. Stir until smooth and glossy.
-
Finalize the cheesecake: Allow the cheesecake to cool completely before pouring the ganache on top. Spread it evenly and garnish with chocolate shavings or curls.
-
Chill: Refrigerate the cheesecake for at least four hours, or ideally overnight, to enhance the flavors and allow it to set perfectly.
Chef’s Notes & Helpful Tips
- Make-ahead tips: Prepare your cheesecake a day in advance. It tastes even better the next day, allowing the flavors to meld beautifully.
- Cooking alternatives: While this recipe is designed for the oven, consider using an air fryer if you’re short on oven space. Adjust cooking times, as air fryers can cook faster.
- Customization ideas: Love nuts? Add toasted walnuts or almonds to the crust for a satisfying crunch. For an elevated flavor, swirl in some caramel sauce or chocolate fudge into the filling before baking.
Common Mistakes to Avoid
Baking can be finicky, but avoiding these mistakes ensures a flawless cheesecake:
- Overmixing the batter: This can incorporate too much air and lead to cracks. Mix just until smooth.
- Not allowing the eggs to come to room temperature: Cold eggs can result in a lumpy batter, so let them warm up for optimal blending.
- Skipping the water bath: If possible, use a water bath (bain-marie) during baking; it helps maintain moisture and regulates temperature, preventing cracks.
What to Serve With Espresso Cheesecake
Enhance your espresso cheesecake experience with these delightful pairings:
- Fresh Berries: Strawberries or raspberries offer a tart contrast to the rich cheesecake and enhance its visual appeal.
- Light Whipped Cream: A dollop of lightly sweetened whipped cream adds airiness and balances the indulgence.
- Coffee or Espresso: Serve with a shot of coffee or espresso for an extra kick that complements the cheesecake’s flavors beautifully.
- Chocolate Truffles: Homemade or store-bought truffles offer another layer of chocolatey goodness and elegance.
- Vanilla Ice Cream: The creaminess of vanilla ice cream adds a delightful coldness that offsets the warmth of the cheesecake.
- Toasted Nuts: Pecans or hazelnuts can provide a lovely crunchy contrast and introduce another flavor dimension.
- Chocolate Sauce: Drizzle over each slice for those with a chocolate sweet tooth, enhancing the dessert’s decadence.
- A Sip of Port or Dessert Wine: A glass of sweet wine heightens the dessert experience and balances the richness of the cheesecake.
Storage & Reheating Instructions
Store any leftovers covered in the refrigerator for up to five days. For longer storage, wrap the cheesecake tightly in plastic wrap and place it in an airtight container. It will keep in the freezer for up to three months. When you’re ready to enjoy it again, thaw overnight in the fridge before slicing. Reheat individual slices in the microwave for about 15-20 seconds to bring a touch of warmth back to every bite, but make sure not to overdo it!
Estimated Nutrition Information
Approximate values per slice (1/12 of cheesecake):
- Calories: 380
- Total Fat: 27g
- Saturated Fat: 17g
- Cholesterol: 90mg
- Sodium: 200mg
- Total Carbohydrates: 32g
- Dietary Fiber: 1g
- Sugars: 25g
- Protein: 6g
(Note: Values vary based on ingredient brands and methods used.)
FAQs
1. Can I make this cheesecake gluten-free?
Absolutely! Simply use gluten-free chocolate cookies for the crust, and the rest of the ingredients are naturally gluten-free.
2. What if I don’t have instant espresso powder?
You can substitute with brewed espresso instead. Use about 1/2 cup of strong coffee to maintain flavor, but this may alter the cheesecake’s texture slightly.
3. How can I tell when my cheesecake is done baking?
The edges of the cheesecake should look set while the center remains slightly wobbly when gently shaken. It will firm up as it cools.
4. Can I freeze an unbaked cheesecake?
Yes, you can freeze the unbaked filling if you well wrap it up. Just ensure the crust is fully cooled before adding the filling. Thaw in the fridge before baking.
5. Can I adjust the sweetness?
Feel free to reduce the sugar for a less sweet version. However, keep in mind that the balance of flavors might shift slightly.
As you stand in your kitchen, the tantalizing aromas waft through the air, you can almost hear the smooth invite of this espresso cheesecake calling you to take a slice. Each bite promises an indulgence that mingles happy memories with every forkful. Dive in and create your own delicious story with this exquisite treat, and don’t forget to share it with those you cherish!
Print
Espresso Cheesecake
- Prep Time: 20 minutes
- Cook Time: 60 minutes
- Total Time: 80 minutes
- Yield: 12 servings 1x
- Category: Dessert
- Method: Baking
- Cuisine: American
- Diet: Vegetarian
Description
A decadent espresso cheesecake featuring a smooth filling and a crunchy chocolate crust, perfect for any occasion.
Ingredients
- 2 cups chocolate cookie crumbs (like Oreos, no filling)
- 5 tbsp melted butter
- 3 (8 oz) packages cream cheese, softened
- 1 cup granulated sugar
- 1/2 cup sour cream
- 1/4 cup heavy cream
- 2 tbsp instant espresso powder
- 1 tsp vanilla extract
- 3 large eggs
- 1/2 cup heavy cream (for ganache)
- 4 oz semi-sweet chocolate, finely chopped
- Dark chocolate shavings or curls (for garnish)
Instructions
- Preheat your oven to 325°F (160°C).
- Prepare the crust by mixing chocolate cookie crumbs with melted butter, then press into the bottom of a 9-inch springform pan. Bake for 10 minutes and cool completely.
- Craft the filling by beating softened cream cheese until smooth, then gradually add sugar, mixing well. Incorporate sour cream, heavy cream, dissolved espresso powder, and vanilla extract until smooth.
- Add eggs one at a time, mixing well after each addition.
- Pour the filling over the cooled crust and bake for 50-60 minutes until edges are set but center jiggles slightly. Leave oven off with the door cracked open for about an hour.
- Make the ganache by heating heavy cream until steaming, then pour over chopped chocolate and stir until smooth.
- Finalize the cheesecake by cooling it completely before pouring ganache on top. Garnish with chocolate shavings.
- Chill in the refrigerator for at least four hours, or overnight, before serving.
Notes
For best results, make the cheesecake a day in advance. It tastes even better the next day! You can also use an air fryer as an alternative cooking method.
Nutrition
- Serving Size: 1 slice
- Calories: 380
- Sugar: 25g
- Sodium: 200mg
- Fat: 27g
- Saturated Fat: 17g
- Unsaturated Fat: 8g
- Trans Fat: 0g
- Carbohydrates: 32g
- Fiber: 1g
- Protein: 6g
- Cholesterol: 90mg