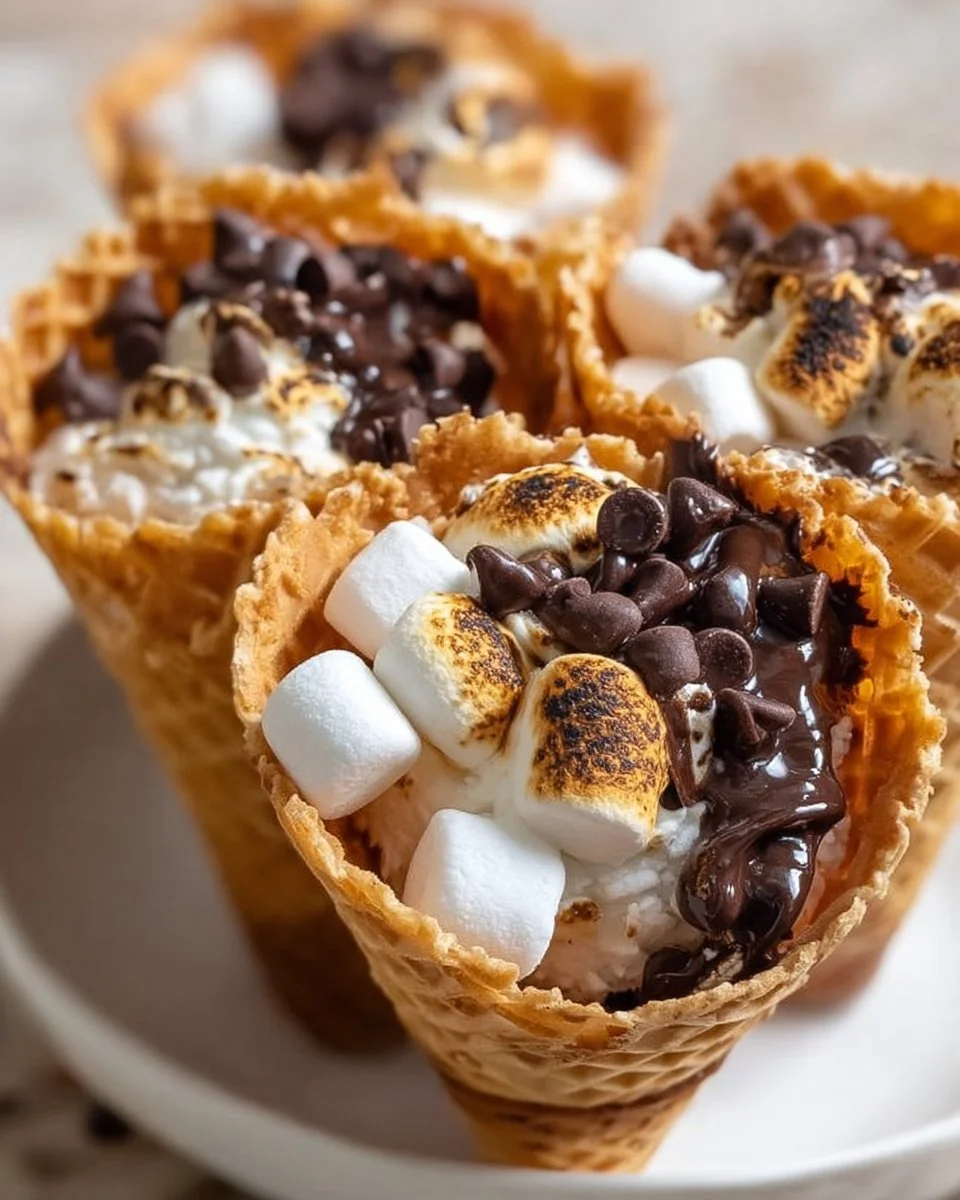
Sizzling fireside gatherings, laughter shared under the starry night, and the enchanting aroma of melting chocolate and toasty marshmallows—a childhood favorite welcomes us back in the most delightful way. Picture this: you take a bite into a warm, crunchy sugar cone filled to the brim with perfectly caramelized marshmallows, creamy chocolate, and maybe a sprinkle of colorful toppings. The moment you sink your teeth into this treat, a symphony of flavors bursts on your palate, igniting memories of campfires and sleepy summer nights. Welcome to the world of S’Mores Cones!
These delightful sweets elevate the classic S’mores experience. Gone are the days of sticky fingers and charred marshmallows on skewers. Instead, S’Mores Cones combine convenience with nostalgia, delivering a deliciously creative twist on a beloved dessert. Each cone holds the promise of gooey goodness, golden brown marshmallows, and a touch of chocolate heaven, creating an irresistible dessert that beckons to be shared with friends and family.
Creating these assembled masterpieces invites excitement, not just for the joy of taste but for the simple process of putting them together. Digging into a warm S’Mores Cone ignites an explosion of flavor, combining crunch, creaminess, and warmth in one satisfying bite. As you unwrap your creation, steam wafts into the air, teasing your senses with a promise of sweetness. The robust flavor of chocolate paired with the velvety softness of the marshmallows serves as a reminder that simple pleasures often bring the greatest joy.
Why You’ll Love This S’Mores Cone
When you take a crunchy bite into a S’Mores Cone, you’ll discover a union of taste and nostalgia that leaves everyone smiling. The beloved combination of chocolate and marshmallow shines, offering an extraordinary treat that fits effortlessly into countless occasions. Whether you wish to create an unforgettable campfire experience, enjoy the sweet tradeoff for boredom on a rainy afternoon, or surprise guests at a backyard barbecue, this delectable treat never disappoints.
With each cone bursting with flavor, you won’t just be offering a dessert; you’ll be serving moments. They evoke warm memories, making them perfect for gatherings where laughter reigns and stories unfold. The ease of preparation perfectly complements their lavish flavors, making these cones an unbeatable crowd-pleaser that stands out with its creative flair.
Preparation Phase & Tools to Use
To dive into the world of S’Mores Cones, ensure you have a few essential kitchen tools. Having these items on hand will make the process smooth and enjoyable:
- Baking Sheet: This will hold your cones as they bake to golden perfection.
- Aluminum Foil: Essential for wrapping the cones before heating them, helping to keep the warmth and flavors locked in.
- Oven or Grill: The source of magic, where the marshmallows toast and the chocolate melts into creamy goodness.
- Tongs: Handy for removing the hot cones from the oven or grill, protecting your hands from any heat.
By organizing your workspace and gathering these tools, you set up for a delightful cooking experience that ultimately heightens the enjoyment of this sweet adventure.
Ingredients for S’Mores Cones
To recreate this campfire-inspired treat, gather these key ingredients:
- 12 Sugar or Waffle Cones: Choose sugar cones for added sweetness or waffle cones for an extra layer of texture.
- 1 Bag Mini Marshmallows: Their cotton-candy-like texture transforms into a toasty gooeyness when heated.
- 12 oz Chocolate Chips: Semi-sweet chocolate chips melt beautifully, adding that rich, creamy essence we all adore.
Consider substituting dark chocolate for a more decadent twist or using flavored chocolate for a unique flair. You can even explore adding crushed candy bars or nuts for that extra crunch!
How to Make S’Mores Cones
Step into the enjoyment of creating S’Mores Cones with these simple instructions:
-
Prepare the Cones: Carefully fill each sugar or waffle cone with miniature marshmallows, making sure to pack them in tightly for optimum gooeyness.
-
Add Chocolate Chips: Generously sprinkle chocolate chips over the top of the marshmallows, allowing them to nestle in between the fluffy clouds.
-
Wrap with Foil: Gently wrap each filled cone in aluminum foil, sealing the edges to trap the heat and moisture.
-
Cook to Perfection: Place the foil-wrapped cones in a preheated oven at 350°F or on a heated grill. Let them bask in the warmth for 7 to 10 minutes. Keep an eye on them as the marshmallows puff up and the chocolate melts!
-
Unwrap and Enjoy: Carefully unwrap the foil (remember, they’ll be hot!), allowing the steam to escape. Bite into your creation, and prepare for a heavenly experience.
Chef’s Notes & Helpful Tips
To get the most out of your S’Mores Cones experience, consider these tips:
- Make-Ahead: Prepare the cones ahead of time by filling and wrapping them. Just store them in the fridge until you’re ready to heat them.
- Cooking Alternatives: If you lack an oven or grill, utilize an air fryer! Set it to 350°F and check on the cones after a few minutes.
- Customization Ideas: Experiment with your favorite toppings—add crushed graham crackers, fruity marshmallows, or drizzle caramel over the top for an irresistible twist.
Common Mistakes to Avoid
To ensure a perfect S’Mores Cone every time, keep these common pitfalls in mind:
- Overstuffing the Cones: Resist the urge to cram in too many marshmallows or chocolates. This can lead to spills and a messy experience!
- Neglecting the Heating Time: Keep a close check while heating to avoid burnt marshmallows. Aim for that golden-brown color for optimum flavor.
- Forgetting to Seal: Always wrap your cones snugly in aluminum foil to prevent heat from escaping. A loose wrap can lead to uneven melting.
What to Serve With S’Mores Cones
These S’Mores Cones can shine even brighter when served alongside some delightful pairings. Here are some ideas:
- Fresh Berries: The tartness of strawberries or blueberries nicely contrasts the sweetness of the S’Mores.
- Vanilla Ice Cream: Serve your warm cone alongside a scoop of vanilla ice cream for an indulgent experience.
- Cold Milk: Pair these treats with a glass of ice-cold milk to wash down the sweetness.
- Chocolate Sauce: Drizzle some rich chocolate sauce over your cone for an extra chocolatey kick.
- Fruit Skewers: Lighten up the dessert table with colorful fruit skewers for a refreshing balance.
- Nutty Trail Mix: Offer a side of crunchy trail mix to complement the softness of the cones.
- Herbal Tea: A light, herbal tea can be a delightful way to finish off the sweetness.
Storage & Reheating Instructions
For leftovers or meal prep, store any unwrapped S’Mores Cones in an airtight container. They can last up to two days at room temperature. If you want to savor the delightful flavors longer, freeze assembled (but unheated) cones. Just fold them tightly in foil and pop them in the freezer.
To reheat, unwrap the frozen cones and follow the original heating instructions, and allow a few extra minutes for them to warm through.
Estimated Nutrition Information
While enjoying a S’Mores Cone, you indulge in approximately:
- Calories: 220 per cone (based on ingredients).
- Carbohydrates: 30g
- Protein: 3g
- Fat: 10g
Please remember that these values can vary depending on ingredient choices and specific brands used.
FAQs
1. Can I use different types of cones?
Absolutely! While sugar and waffle cones are fantastic choices, you can experiment with chocolate cones or even homemade cones to create a unique treat.
2. How do I store leftovers?
Store leftovers in an airtight container at room temperature for up to two days, or freeze them for a longer-lasting treat.
3. Can I make mini S’Mores Cones?
Yes! Simply use mini cones and adjust the quantities of ingredients to fit. They make adorable bite-sized treats, perfect for parties.
4. Are S’Mores Cones gluten-free?
Using gluten-free cones and chocolate ensures this dessert is gluten-free. Always check labels to ensure your products meet gluten-free standards.
5. Can I add other fillings to my S’Mores Cones?
Absolutely! Get creative and add layers of peanut butter, Nutella, or even fruit slices for an exciting twist on your classic S’Mores Cone.
As you savor that first bite of your warm S’Mores Cone, remember the magic of creation and the joy of sharing it with loved ones. Each cone becomes its own adventure, full of melted chocolate, fluffy marshmallow, and the goodness of being together. So gather your loved ones, grab those cones, and take a moment to reconnect while indulging in this simple pleasure. You won’t regret it!
Print
S’mores Cones
- Prep Time: 10 minutes
- Cook Time: 10 minutes
- Total Time: 20 minutes
- Yield: 12 servings 1x
- Category: Dessert
- Method: Baking
- Cuisine: American
- Diet: Vegetarian
Description
S’mores Cones elevate the classic campfire treat with crunchy cones filled with gooey marshmallows and melted chocolate.
Ingredients
- 12 Sugar or Waffle Cones
- 1 Bag Mini Marshmallows
- 12 oz Semi-Sweet Chocolate Chips
Instructions
- Prepare the Cones: Carefully fill each sugar or waffle cone with miniature marshmallows, making sure to pack them in tightly for optimum gooeyness.
- Add Chocolate Chips: Generously sprinkle chocolate chips over the top of the marshmallows, allowing them to nestle in between.
- Wrap with Foil: Gently wrap each filled cone in aluminum foil, sealing the edges to trap heat and moisture.
- Cook to Perfection: Place the foil-wrapped cones in a preheated oven at 350°F (175°C) or on a heated grill. Let them bask in the warmth for 7 to 10 minutes.
- Unwrap and Enjoy: Carefully unwrap the foil (remember, they’ll be hot!), allowing steam to escape, and take a bite into your creation.
Notes
Make-Ahead: Prepare the cones and store in the fridge until ready to heat. Consider using an air fryer if you don’t have an oven or grill.
Nutrition
- Serving Size: 1 cone
- Calories: 220
- Sugar: 25g
- Sodium: 150mg
- Fat: 10g
- Saturated Fat: 5g
- Unsaturated Fat: 3g
- Trans Fat: 0g
- Carbohydrates: 30g
- Fiber: 1g
- Protein: 3g
- Cholesterol: 0mg